黏土人物雕塑
原文链接:https://thatartteacher.com/2020/08/04/clay-figure-sculpture/
日期: 2020-08-04
作者: Sierra Machado
分类: 美术教程、远程教学、长课时教案、雕塑
标签: 干燥黏土课、Amaco空气干燥黏土教程、Amaco黏土课、美术远程教学资源、美术教育、美术教师、美术教程、陶艺、陶艺课、黏土、黏土动作人偶、黏土艺术、黏土远程教学课、黏土人物课、黏土人物雕塑、黏土教案、黏土教程、精选、为未来设计、优质空气干燥黏土、高中黏土课、初中黏土课、制陶、雕塑教程、那位美术教师
我希望本学年能成为尝试全新创意或重启经典课程的一年。还有什么比在全球疫情中开展教学更能激发你的想象力呢?
我始终希望学生拥有创作雕塑的机会。而2020年,一个需保持社交距离的美术教室,与过去喧闹繁忙的黏土清理场景已截然不同。
若学生无法共用材料,他们该如何创作雕塑?
三十名学生如何共用一个水槽洗手?
若项目中途转为远程教学,又该怎么办?
倘若我能回答所有(以及更多)这类问题,我立刻就会写一本书。但有一点我确信无疑:本学年的成败,取决于灵活性、耐心,以及与学生建立良好关系的能力。我知道,许多美术教师——包括我自己——都在寻找三维艺术创作方案。教师们渴望在种种限制之下,依然保持学生的参与热情。今年我或许无法实际讲授这一课,甚至任何我惯常教授的课程,但我正努力保持镇定与创意。
本作品所需黏土极少,既可在家中完成,也可在教室中使用Amaco空气干燥黏土制作。它还是探索深厚艺术史脉络的绝佳契机,学生亦可借由人体形象表达自身思想与经历。
本文含本人真诚推荐并日常用于课堂的教具之附属链接。若您通过这些链接购买商品,我们可能获得佣金,且不会为您增加任何额外费用。#美术教师副业
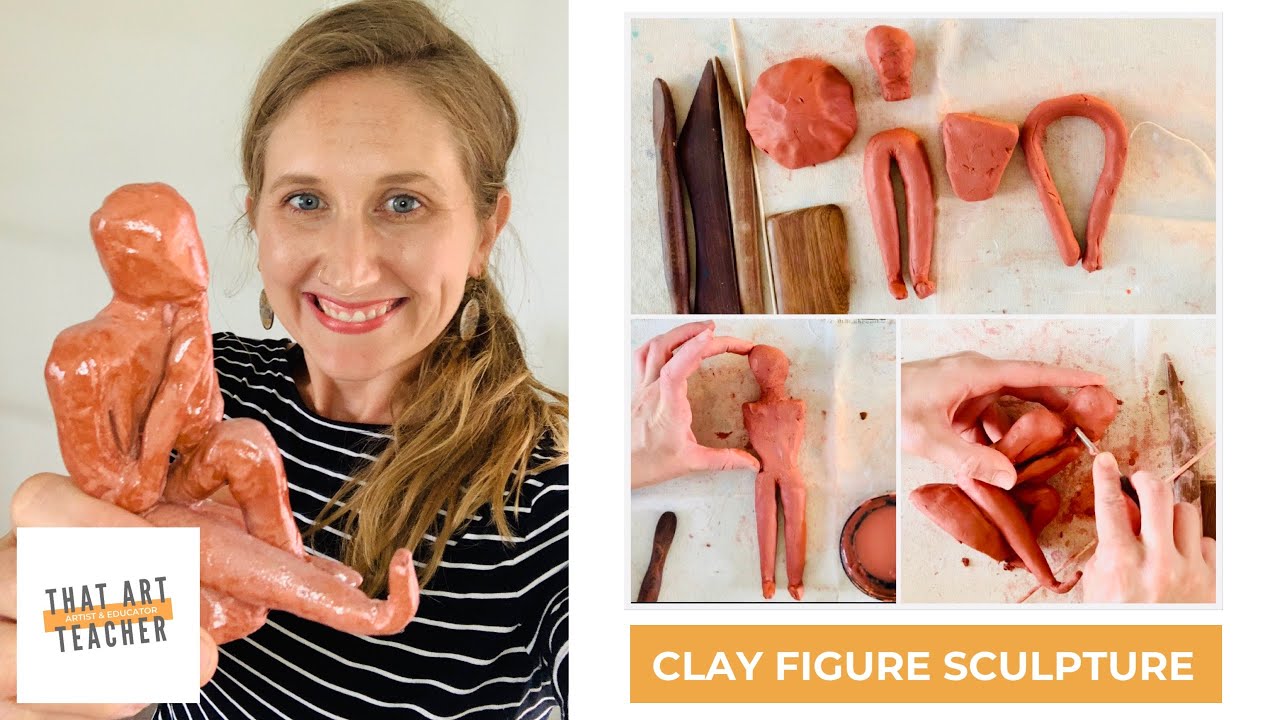
视频教程
若您想直接了解该雕塑的制作过程,请点击下方视频链接——本文将全程引用此视频。该视频完全适用于课堂教学!
这是一则详尽的分步教程,您可根据学生(或您自己!)完成各环节的进度,将其拆分为若干小段。
头脑风暴
本课核心目标有二:一是帮助学生理解三维空间中的人体比例;二是引导他们学会运用人体姿态表现情绪或神态。
我喜欢以这一焦点问题开启课程:身为21世纪的青少年,是一种怎样的体验?
我首先请学生书写、反思并讨论他们在各类情境中的多重感受。有时学生进行书面反思,有时则在我口头列举各种情境时快速记下想法。我会鼓励他们超越“生气”“悲伤”等基础词汇。
待他们写下若干亲身经历与描述性词语后,我们便进一步探讨:如何通过塑造人体来呈现那种感受?若您希望组织一场趣味十足的课堂活动,可让学生提出不同情绪,再请一名学生扮演“雕塑”,摆出相应姿态。此活动既可全班共同参与,也可分小组进行——没错,过程会很滑稽,也会很热闹。这正是让学生动起来、思考身体姿态的良机,也自然融入了动态速写练习。具体形式则取决于您的授课对象年龄、单元目标及课时安排。
个性表达
学生往往更关注人物的姿态动作,而非其背后的情绪表达。因此,我需引导他们深入思考:如何借由这一动作传达人物内心感受。学生常热衷引入体育元素,也常希望添加道具——对此,我尽量避免。初次接触人体雕塑时,“简洁”才是上策。
例如,若学生卡在“我热爱足球,所以我的雕塑正在踢足球”这一思路中,我们会一起探讨:你踢球那一瞬间的真实感受是什么?是坚定?焦虑?自信?……部分学生会立刻爱上这个概念,并迅速构思出一整套富有表现力的姿态方案。
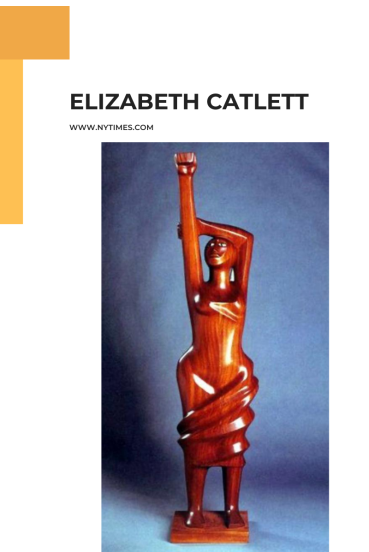
由于我希望学生立足当下现实,运用自身真实经历进行创作,因此我会向他们展示才华横溢的艺术家伊丽莎白·卡特莱特(Elizabeth Catlett)的多件雕塑作品。
致敬黑人女诗人
伊丽莎白·卡特莱特充满力量的雕塑,正是以人体形象传达情感的完美范例。她以女性形象为载体,诉说身为非裔美国女性与母亲的生命体验。我尤为喜爱借助她的作品,提醒学生关注美国历史上的重要时期。卡特莱特是奴隶的孙女,这一身份深刻影响着她的艺术创作;此外,她在1930年代作为黑人女性成长的经历,同样意义深远。
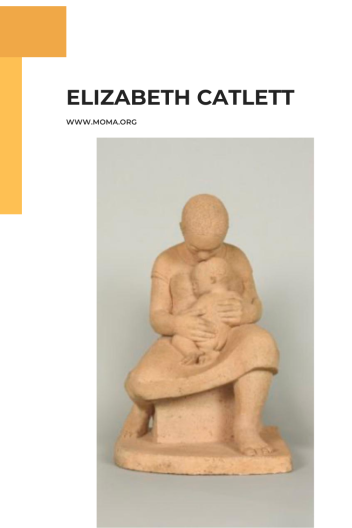
母亲与孩子,1956年
我从不在美术课上回避这类话题,因为脱离语境,这些作品便不复存在。伊丽莎白·卡特莱特(Elizabeth Catlett)的个人经历赋予了她的雕塑以生命,这能切实帮助学生理解艺术表达,并学会如何将自身经历融入创作。
学生总会注意到卡特莱特所强调的女性曲线。她部分雕塑的乳房刻画十分明确,因此在挑选图片时请务必留意这一点。我习惯从一开始就指出:尽管她的雕塑高度抽象、高度简化,但她仍提供了足够信息,让我们清晰感知人物的情绪。
一个有趣的活动是让学生对比卡特莱特的人体雕塑与阿尔贝托·贾科梅蒂(Alberto Giacometti)那令人不安的纤细人体雕塑。贾科梅蒂同样是借人体探索人类经验的艺术家,与卡特莱特并置讨论,能很好地引出“艺术如何表现时间、人物与场所”这一主题。
我喜欢向学生展示他们从未见过的新作品;但同时,我也认为有必要穿插一些他们更可能接触到的名作,例如罗丹的《思想者》。这也是另一位受人类生存境遇启发的艺术家——他的这件雕塑正映射了法国大革命后弥漫的混乱与恐怖。
学生一定会注意到《思想者》是裸体的。与贾科梅蒂和卡特莱特一样,你无法看到任何明确的裸露身体部位;但不同于这两位艺术家,《思想者》却极度写实。
我通常会直截了当地引导:先让学生写下三条观察结果作为热身练习,再请他们大声分享。几乎每次讨论中,总会有学生脱口而出:“他没穿衣服!”若无人提及,我便会说:“我相信大家已经注意到,他身上没有衣物。”这句话常引发会心微笑与笑声。有时我甚至故意用“光溜溜的(nakey)”一词——毕竟我爱演,实在忍不住。
为深入探讨这一话题,我会播放北卡罗来纳州艺术博物馆提供的这段视频。
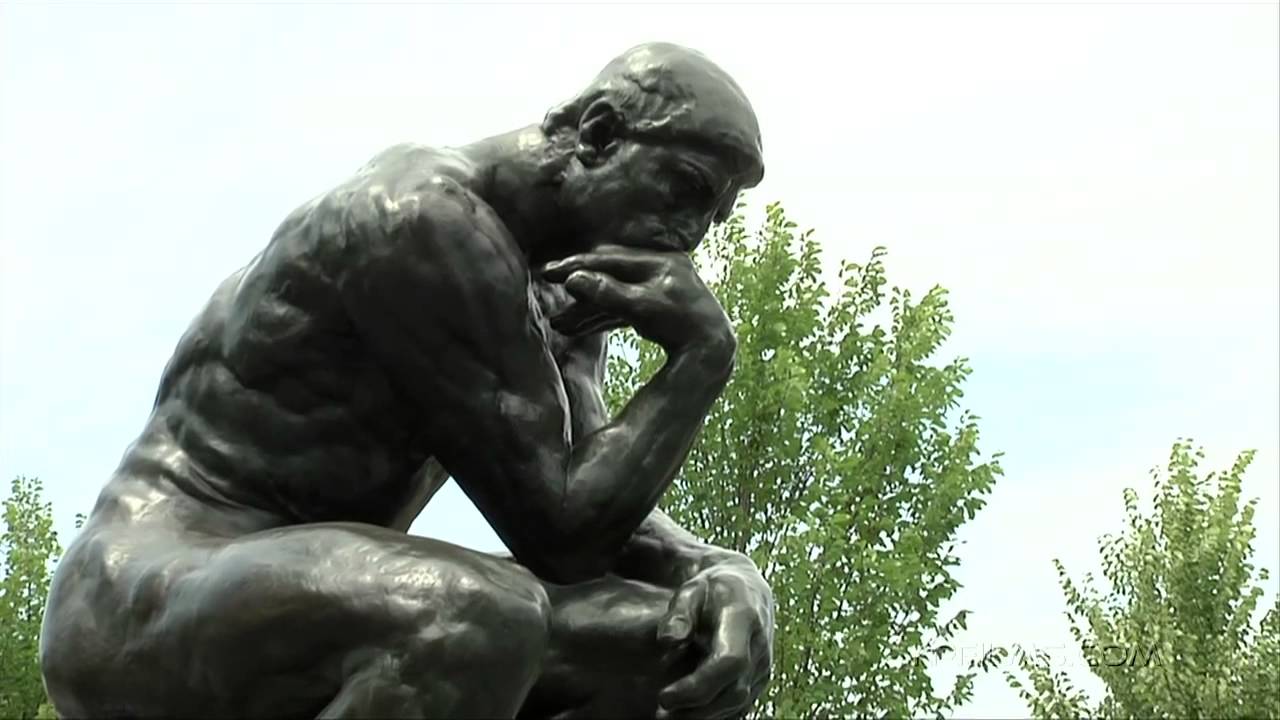
它简短精炼,却提出了大量关于罗丹创作选择(例如不着衣物)的精彩观点。我会提前提醒学生:旁白者的语调略显平淡,但切勿因此低估内容——他其实提出了多个饶有趣味的见解。
在整个项目过程中,我每天都会带领学生完成速写本热身练习,并将这些活动穿插于雕塑制作的各个阶段。若试图用整整一节课强行塞入所有内容,势必枯燥乏味。我已学会将知识拆解为小块:分批欣赏新作品、分步实践费尔德曼(Feldman)艺术批评法。这既能持续吸引学生兴趣,也能确保艺术史与艺术批评的相关教学标准几乎每日落实。
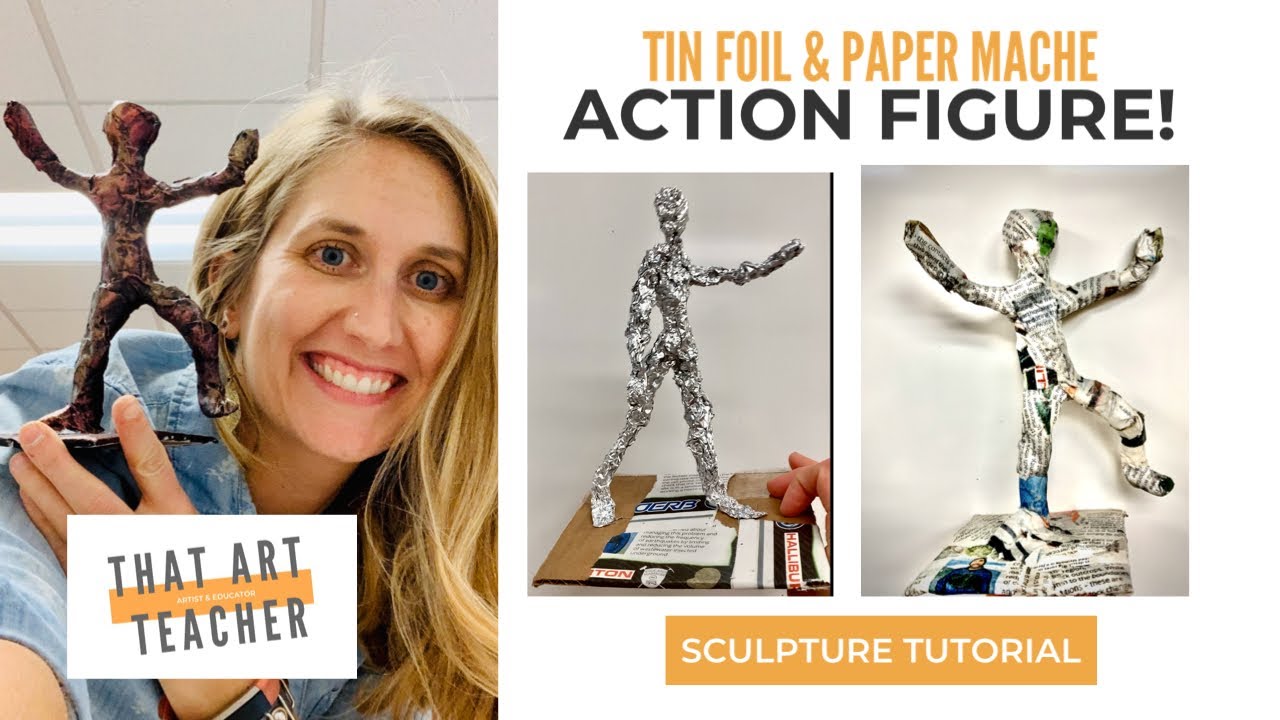
如果你喜欢这一理念,却暂无陶泥可用,不妨试试这个纸浆行动人偶。
材料:
我曾用窑烧陶泥与空气干燥陶泥两种材料教授本课。我尤其钟爱阿玛可(Amaco)墨西哥陶艺空气干燥陶泥——其手感与窑烧陶泥毫无二致,成品效果惊艳。此外,空气干燥陶泥也省去诸多麻烦:既无窑炉爆炸之忧,也免去彻夜难眠、担心学校失火的焦虑。
它同样便于远程教学。我在跨州搬迁前,曾执教高中陶艺课六年。数月来,我一直在反复自问:若开展远程教学,我究竟该教些什么?!
我知道多数学生家中并无空气干燥陶泥,且许多人无力承担其价格。这绝非沃尔玛级别的普通塑形黏土——它是真材实料!我见过不少教师发帖称寄送艺术工具包,而其中一块这种陶泥,足可支撑大量创作。
我校学区计划恢复线下授课(此处略去我的个人观点),而我也清楚,以往常规的盘条成型项目已难以适应当下新常态。本学年,我至少希望能在我唯一一个高级美术班中,重新启用陶泥进行教学。


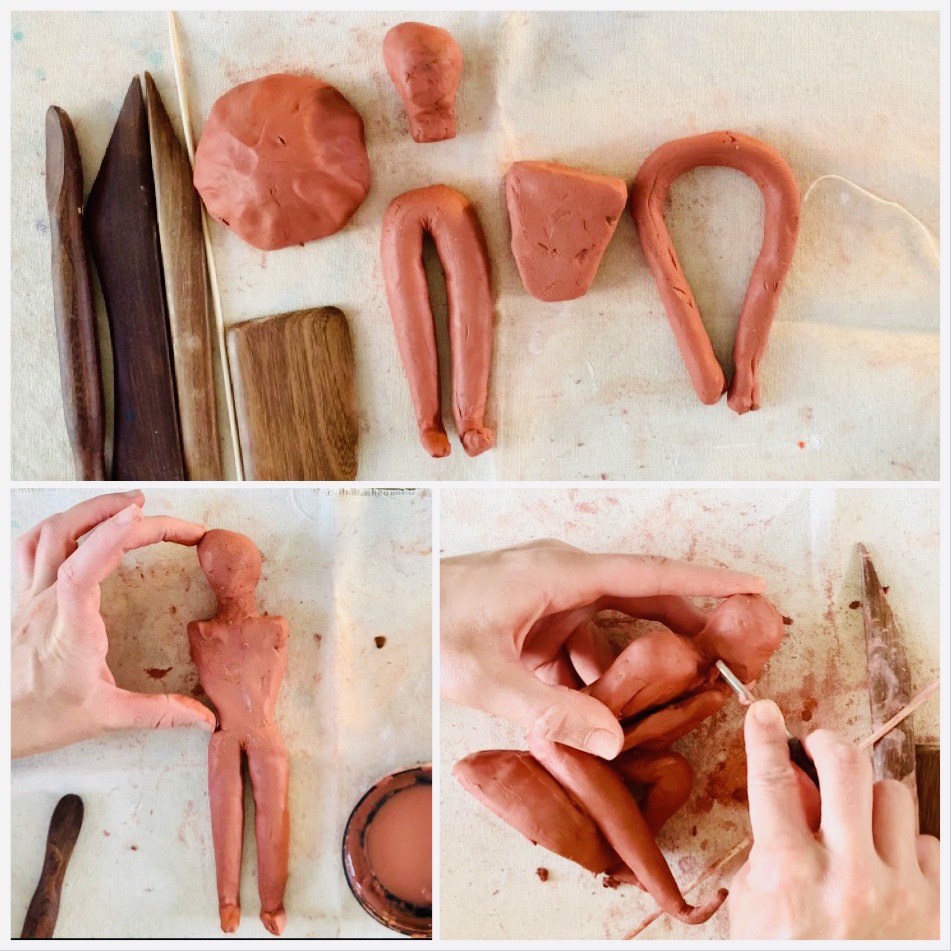
腿部
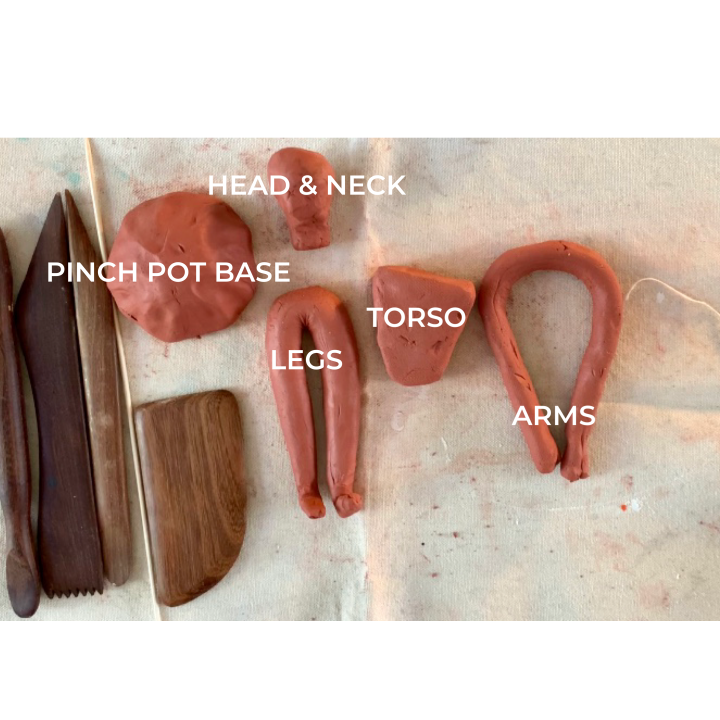
- 先搓一条粗细约等于拇指宽度的泥条。务必先揉泥排气,避免内部藏有气泡。
- 泥条需中部较粗(对应髋部/臀部),两端较细(对应脚踝)。
- 将泥条对折,形成双腿。
- 小心地将双脚分别向上弯折至约90度角。用手指按需塑造脚踝与足部形态。
躯干
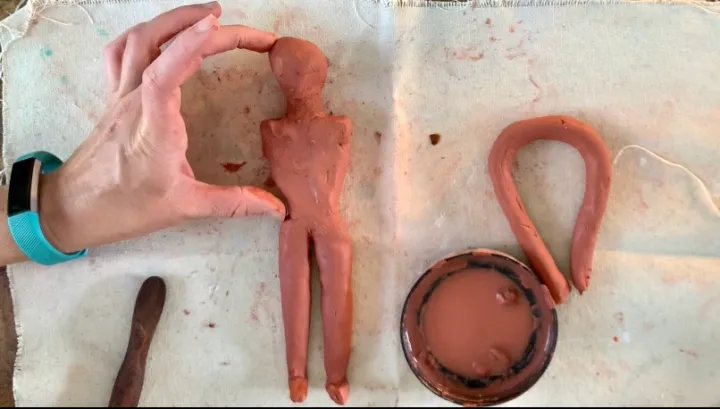
- 取一块陶泥,徒手捏塑成三角形。躯干长度约为腿部长度的一半——头部将补足剩余高度!
手臂
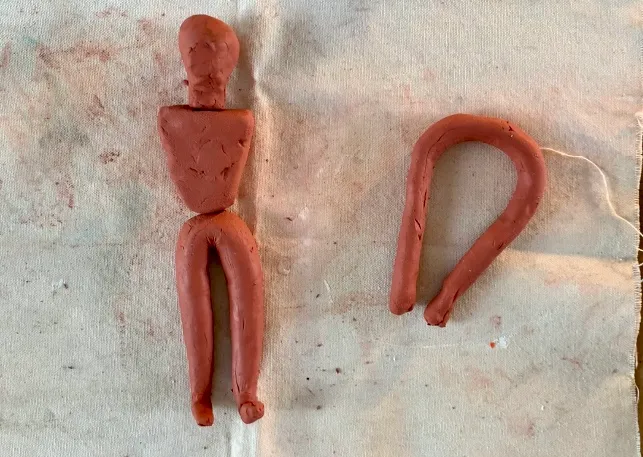
- 再搓一条比腿部更细的泥条,可用食指、中指或小指作为粗细参照。
- 长度虽重要,但暂无需精确把控。我习惯先将手臂连接至躯干,再调整长度与手部造型。有时用一根长泥条,有时则将其分为两段。
头部与颈部
- 捏塑一个球体(美术教师请注意:课堂上切勿使用“球”字代指此物),其直径不可超出双肩宽度。
- 小心地将部分陶泥向下拉伸,形成颈部。用手塑出理想形态——可抽象化、偏圆形;也可细致刻画下颌与颅骨结构。
捏塑底座
我鼓励学生用捏塑法制作底座。因人体比例特殊,独立站立极难实现,故我们主要聚焦于坐姿或卧姿人物。
你当然可以尝试制作自支撑式立像,但我的学生普遍发现:拥有底座辅助平衡后,成功率更高。
刮痕、泥浆与融合
当所有部件均已成型,且彼此尺寸关系准确无误时,便可开始组装了。
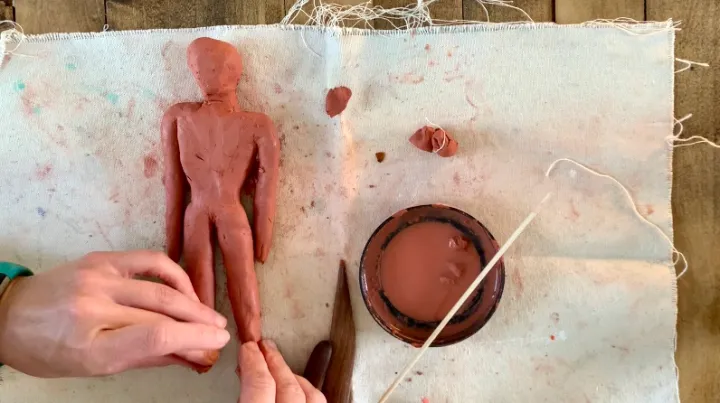
我让学生们用自己的小容器装泥浆,并用画笔将各部件连接起来。竹签比针具更便宜、更安全,而且使用寿命很长。
姿势与表情
当所有部件都仔细粘接并融合完毕后,就该开始确定姿势了。有时学生清楚知道自己想要什么效果,有时则会在制作人偶的过程中不断调整。
请注意:肘部和膝部需在手臂或腿部约中点处形成一个明显的锐角。
(这一步通常安排在第二或第三节课完成。只要每次下课前对陶泥喷水并装入密封袋保存,它就能保持湿润,确保下一节课可继续塑形!)
打磨与完善
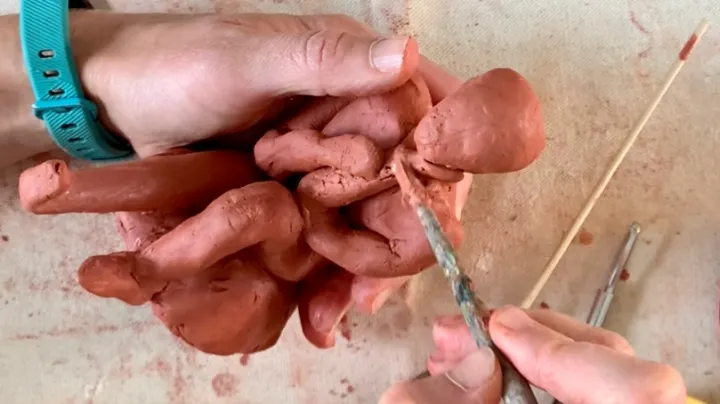
这件雕塑是“圆雕”作品,学生在塑造姿态时需从各个角度反复观察。
我喜欢用画笔或手指来打磨陶泥表面,确保所有身体部位的比例与形态准确无误。我可能在这一步上花上很久,有时还需鼓励学生对表面细节精益求精。尽管“光滑”只是众多肌理中的一种,但如果作品要求光滑,那它就必须真正光滑。你也可以使用各种工具雕刻出不同肌理与细节。我个人偏好极简风格,只专注于姿态本身。
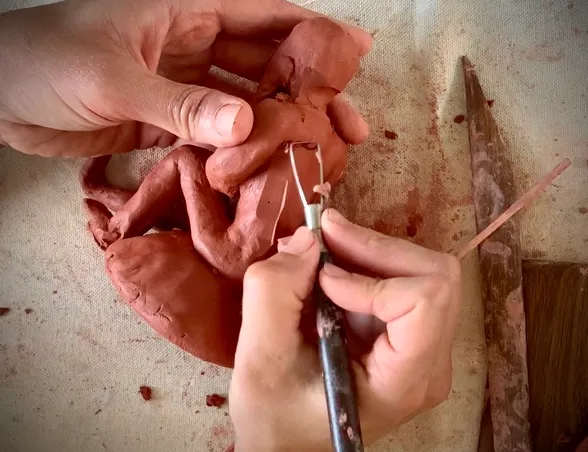
待作品接近干透时,可用干燥的画笔轻轻刷去表面残留的细小陶泥碎屑。
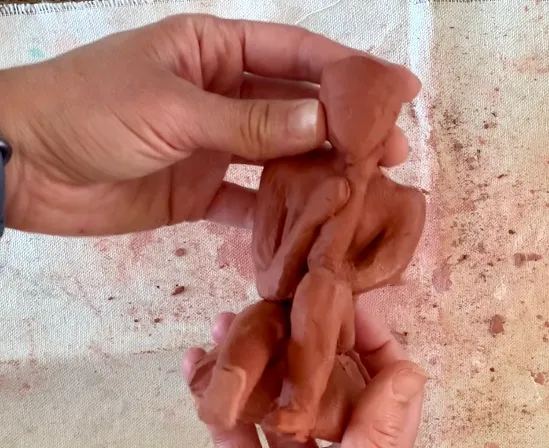
空气干燥陶泥的一大优势在于无需入窑烧制!我特别喜欢使用红陶泥,因为它单看就很美,稍加点缀便更显出众。我个人认为,红色高温烧成陶坯能让釉色显得更加饱满、鲜活。
亮光喷雾
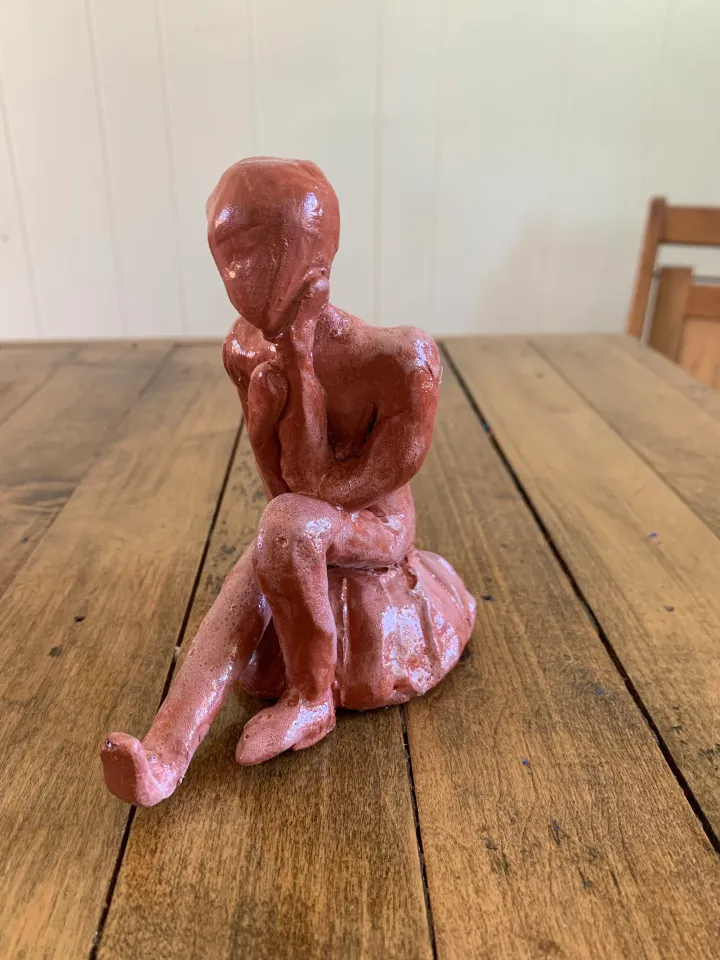
快速喷涂两遍亮光喷雾,是一种经济高效的方法,既能封护陶泥表面,又能赋予其类似釉面的光泽效果。
如果你希望更具挑战性,不妨鼓励学生多做几个!让多个小人偶共处同一底座、彼此互动,是提升表情表现力的绝佳方式,也能帮助学生学习如何围绕主题展开创作。
本学年你正在改编哪些陶泥课程?你又如何引导青少年坦然、开放地探讨人体?期待听到你的分享!
提交表单。
订阅,以免错过任何一篇推送。❤️🎨👩🏼🏫
立即订阅!
2026年1月24日遮蔽诗歌艺术作品
遮蔽诗歌是我最喜爱的融合文学与视觉艺术的方式之一……
2025年8月2日面向中学课堂的10个趣味美术项目
如果你正为新学期做准备,却已感到些许压力……
2025年7月17日借助每日艺术史热身活动与可编辑Google幻灯片提升美术批评能力
我非常激动,终于能与大家分享这些可编辑的Google幻灯片——专为艺术史教学设计……
2025年1月10日受维克·穆尼兹启发的巧克力糖浆绘画
试试这些受维克·穆尼兹启发的巧克力糖浆绘画,让你的……
Original: https://thatartteacher.com/2020/08/04/clay-figure-sculpture/
Date: 2020-08-04
Author: Sierra Machado
Categories: art tutorials, distance learning, long form lesson plan, sculpture
Tags: air dry clay lesson, amaco air dry clay tutorial, amaco clay lesson, art distance learning resources, art education, art teacher, art tutorial, ceramics, ceramics lesson, clay, clay action figure, clay art, clay distance learning lesson, clay figure lesson, clay figure sculpture, clay lesson plan, clay tutorial, featured, for autured, good air dry clay, high school clay lesson, middle school clay lesson, pottery, sculpting tutorial, that art teacher
I am hoping this school year will be one for trying out brand new ideas or bringing back old favorites. Nothings stretches your imagination like teaching during a global pandemic, right?
I always want my students to have opportunities to create sculpture. In 2020, a social distanced art room is very different than the hustle and bustle of a clay clean-up from the past.
How will students create sculptures if they can’t share materials?
How can 30 students wash their hands at one sink?
What if we switch to distance learning in the middle of a project?
If I had the answers to all of these (and so many more) questions, I’d write a book immediately. One thing I do know for sure is the success of this year is dependent on flexibility, patience and building relationships with students. I know many art teachers, like myself, are searching for 3-D artworks. Teachers want to keep their students engaged even with the limitations set upon us. I may not get to teach this lesson this year, or any lesson I’m used to, but I am trying to stay calm and creative.
This artwork requires very little clay and can be done at home or in the classroom with Amaco Air Dry Clay. It is a great opportunity to explore rich art history connections and student’s can express their own thoughts and experiences using the human figure.
This post contains affiliate links to products I truly love and use in my classroom. If you use these links to buy something we may earn a commission at no additional cost to you. #artteachersidehustle
Video Lesson
If you want to jump ahead to how this sculpture is made, here is the video link I will be referencing throughout this post. It is 100% classroom ready!
This is a detailed tutorial is step by step and can be broken into chunks as your students (or yourself!) complete each section.
Brainstorming
My main goals with this lesson are to help students understand three dimensional proportions and how to use the human body to show emotion or expression.
I like to use this focus question: What is it like to be a young person in the 21st century?
I start by having my students write, reflect and discuss the many ways they feel in a variety of situations. Sometimes students do a written reflection and sometimes I have them jot down ideas as I verbally throw out scenarios. I try to push them past basic words like “mad” or “sad”.
Once they have a few experiences and descriptive words written down, we then discuss how they can shape the human body to express that feeling. If you want a really fun class activity, have students suggest emotions and then have a student pretend they are a sculpture and strike a pose. This can be done as a whole class or in a small group, and YES it does get silly and YES it can get loud. It’s a great opportunity to get students moving and thinking about posture. It can also be a great way to incorporate gesture drawing. It all depends on your age group, unit goals and time constraints.
Personal Expression
Students will often want to focus more on the movement of the figure and not the expression behind it. I have to work students through the thought process of using that action to express how the person is feeling. Students love to tie in sports and often want to use props which I try to to avoid. Simple is best when working with the human figure for the first time.
So if a student is stuck on “I love soccer so my sculpture is kicking a soccer ball” we talk through how would you feel at the moment you kick the ball? Would you feel determined, anxious, confident etc.? Some students fall in love with the concept immediately, and they have an entire army of expressive poses to choose from.
Because I want them to use their own personal experiences in today’s world, I show them a variety of sculptures by the talented artist Elizabeth Catlett.
Homage to Black Woman Poets
Elizabeth Catlett’s powerful sculptures are a perfect example of using the human figure for expression. Catlett used the female figure to convey her experience as a African American woman and mother. I love using her work to remind students of important historical time periods in America. Catlett was the granddaughter of slaves and this deeply informed her artwork, not to mention growing up as a black female in the 1930s.
Mother and Child, 1956
I don’t shy away from these conversations in art class because the artwork would not exist without the context. Elizabeth Catlett’s personal experiences are how her sculptures come to life, and this really helps students understand expression and how they can use their own personal experiences in their artwork.
Students will always pick up on the feminine curves Elizabeth Catlett emphasizes. Some of her sculptures can have very defined breasts so keep that in mind when selecting images. I like to point out from the start that although her sculptures are abstract and simplified, she gives us enough information to know what they are feeling.
A fun activity is to have students compare and contrast Catlett’s figure sculptures to Alberto Giacometti’s hauntingly slender figure sculptures. He is another artist that uses the figure to explore the human experience and pairs well with the discussion of how art can represent time, people and place.
I love to show students new artworks that they have never seen before, but I also think it’s important to throw in some of the famous artworks they may be more likely to come across such as Rodin’s The Thinker. This is another example of an artist that was inspired by the human condition. His sculpture represents the chaos and horrors following the French Revolution.
Students will absolutely notice that The Thinker is naked. Like Giacometti and Catlett you can’t see any defined nude body parts, but unlike these two artists The Thinker is super realistic.
I like to hit this on the head by having students write down three observations as a warm-up and then sharing them out loud. You can almost always count on a student saying “he’s naked!” during the discussion. If this doesn’t happen, I will say “I’m sure you noticed that he is not wearing clothes.” This usually gets some smiles and laughter. Sometimes I say “nakey” because I’m a ham and I can’t help myself.
To work through this topic, I show this video from the North Carolina Museum of Art.
It’s short, concise and brings up so many great points about Rodin’s choices (such as no clothes). I do warn my students that the narrators voice is a little dry, but don’t let that fool you because he brings up several interesting points.
I do a daily sketchbook warm-up with my students over the course of the project and sprinkle these activities in throughout the process of sculpting. It would be really tedious to spend one entire class period trying to cram in all of these ideas. I’ve learning to chunk bits of information, looking at new artworks and practicing the Feldmans Method of Art Criticism into small doses. This helps keep kids interested and ensures art history and criticism standards are presented on an almost daily basis.
If you are loving this concept but don’t have access to clay, try out this Paper Mache Action Figure.
Materials:
I have taught this lesson with kiln fired clay and air dry clay. I love Amaco’s Mexican Pottery air dry clay because it feels exactly like kiln fired clay with striking results. I also love the low drama of air dry clay. There’s no kiln explosions or sleepless nights that your school is burning down.
It’s also convenient for distance learning. I taught high school ceramics for six years before moving states and I’ve been asking myself for months WHAT would I have taught during distance learning?!
I know most students do not have air dry clay at home and so many cannot afford the price. This is not your Walmart level modeling clay- it’s legit!I’ve seen a lot of teachers posting about sending home art kits and a hunk of this would go a long way.
My school district is planning on opening in person (I’ll leave my personal opinion out of it) and I know my regular coil building project won’t fit into our new normal. I am hoping I can at least break out the clay with my one section of advanced art this school year.
Legs
-
Start by rolling a coil that is about the width of your thumb. Make sure to wedge your clay first so there are no hidden air pockets.
-
Your coil needs to be thicker in the middle (hips/rear end) and thinner at both ends (ankles)
-
Fold your coil in half to create your legs.
-
Carefully bend each foot up to about a 90 degree angle. Use your fingers to sculpt the ankles and feet as desired.
Torso
- Pick up a piece of clay and hand mold it into a triangular shape. Your toros needs to be about half the length of your legs. Your head will make up the rest!
Arms
-
Roll another coil that is thinner than your legs. Use your index, pointer or pinky finger as a guide.
-
The length does matter, but don’t worry about that yet. I like to shape the length and the hands after I’ve attached each arm to the torso. Sometimes I use one long coil and sometimes I break it into two pieces.
Head & Neck
-
Form a sphere (art teachers: never say balls in art class) that does not expand past your shoulders.
-
Carefully pull some of your clay down to form a neck. Use your hands to mold it into the form you want. It can be abstract and more circular or you can spend time forming a chin and more skull like shape.
Pinch Pot Base
I like for students to create a pinch pot to use as a base. It is very difficult to create a standing figure with these proportions, so we mainly focus on seated or reclining figures.
You can create a self supporting figure, but my students find more success when they have base to work with when finding balance.
Score, Slip & Blend
Now that you have all of your pieces and their size relationships are correct, it’s time to start attaching everything.
I have students use their own small containers of slip and a paintbrush to connect their pieces. A bamboo skewer is a cheaper and safer alternative to needle tools and they last a really long time.
Pose & Expression
Once everything is carefully attached and blended together, it’s time to start finding a pose. Sometimes students know exactly what they want and sometimes it changes as they work with their figure.
Keep in mind elbows and knees need to have a sharp angle at about the halfway point of the arm.
(Many times this is done on the second or even third class period. As long as clay is sprayed and put in a bag at the end of each class, it should be ready to sculpt the next class period!)
Smoothing & Perfecting
This sculpture is “in the round” and needs to be looked at from all angles as students create their posture.
I like to use a paintbrush or my fingers to smooth my clay and make sure all of my body parts look correct. I could spend forever on this, and sometimes have to encourage my students to be picky with their surfaces. Although smooth is just one texture, if it’s supposed to be smooth it better be smooth. You can use a variety of tools to carve in textures and details. I like to keep mine really simple and just focus on the pose.
Once it’s almost dry, you can use a dry paint brush to clean up any little crumbs of clay leftover.
The beauty of air dry clay is that you don’t have to put it in the kiln! I love using red clay because I think it looks really nice by itself or with small enhancements. I personally think red kiln fired clay makes glazes look so much richer and vibrant.
Gloss Spray
A quick two costs of spray gloss is a cost effective and way to seal clay and give it that shiny coat that mimics glaze.
If you are feeling adventurous, have them make more than one! Several figures interacting on the same base is a great way to level up expression and teach students how to work in a theme.
What clay lessons are you adapting for this school year? How do you get adolescents to talk openly about the human body? I’d love to hear from you!
Submit a form.
Subscribe so you never miss a post. ❤️🎨👩🏼🏫
subscribe!
January 24, 2026Blackout Poetry Artwork
Blackout poetry is one of my favorite ways to combine literature, visual …
August 2, 202510 Engaging Art Projects for Secondary Classrooms
If you’re gearing up for the new school year and already feeling …
July 17, 2025Boost Art Criticism Skills with Daily Art History Warm-Ups & Editable Google Slides
I’m so excited to finally share these editable Google Slides as art history …
January 10, 2025Vik Muniz Inspired Chocolate Syrup Paintings
Try out these Vik Muniz inspired chocolate syrup paintings to get your …


