暖鱼冷海色彩画
Original: https://tabithaannthelostsock.blogspot.com/2018/04/hot-fish-cool-sea.html
Date: 2018-04-01 Tags: art, bubbles, complementary colors, cool colors, crayons, easy, elementary, fish, fun, lesson, Lost Sock art Teacher, ocean, sea, summer, swim, warm colors, water


MINEOLA MIDDLE SCHOOL 2020
Danielle Voyles 7th grade

8th period/ 6th grade
Carol, Hunter, Davis,
Natalie, Grayson and Jeremiah

1st period Art
Jorja, Laine, River,
Kaitlyn, Fransisco and jaylee

3rd Period
Kelly, Mason, Valerie,
Milo, Jarezi, Nathalie and Elizabeth

4th period
Braylee, Josilen, Miayah,
Lovella. Emmily and Victoria

James

5th period
Maleighna, Caroline, Carie,
Mikayla, Destinee, Olivia,
Stephanie, Addyson & Brielle

KRAHN ELEMENTARY SCHOOL/KLEIN ISD
Mrs. Clouse/Rivera's 4th grade class 2018

Valery, Jett, Sophia, Miya,
Patch, NoName, Carter & Bradley
This lesson is perfect for teaching cool and warm colors, complimentary colors, monochromatic colors, space, line, shape and form,
It's perfect for wrapping up the knowledge acquired from the school year all in one lesson.
---------------PRACTICE FISH-------------
I have kids start wit SHAPES.
Here are some basic shapes to begin with for 4 fish.
Add Detail, LINES to make TEXTURE on the fish.

Here are three examples I made while showing classes how to do the fish from the 4 basic shapes.
See how different they turn out when you change the details?

Draw lightly wit a pencil to get in the basic shapes and details.
Then go over the finished product darker or use marker.


Draw light...... then go darker or use a marker.

Get this poster here!
https://www.teacherspayteachers.com/Store/The-Lost-Sock-Art-Teacher
4th Period Art I Practicing
Danielle and Mikayla


Danielle Voyles Practice 97th grade)

HOT WARM PAPER
we are using warm paper because it stands out!
We want out main fish to grab your attention.
(pick red, orange, yellow or pink).

Transfer images onto warm colored paper.
Try your best to FILL UP THE SPACE of the paper so that you can get better details, outline without messing up the details and so that these warm fish will be EMPHASIZED more with the bold outline.
They are the stars of this show, because they are in the FOREGROUND.

After you transfer the practice ideas to the final HOT/WARM with pencil,
outline all pencil with a black marker (including details).
Use a darker shade of crayon/colored pencil to add shading and a white crayon to add highlights.
(see phases below)


(above, teacher example and 7th grader Daniel Voyles)
when deciding what color to use for your shading,
find the HUE (color) of your paper and pick the matching SHADE.

This is how it will end up.


Students drawing on Warm paper, outlining, shading and highlighting.
James, Olivia and Myah


THE COOL OCEAN
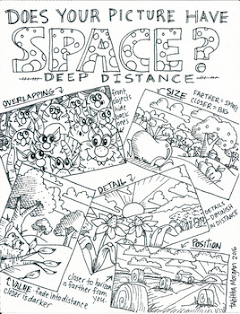
Get this poster here...
https://www.teacherspayteachers.com/Product/Picture-Space-handout-2718478
Before you start on the water, you need to understand depth and space.
When things are closer to you in the water, they are more bold and clearly defined.
As they go back further from you, they become less defined (lighter and more blurry)
This picture is a great representation of this element of art.
FOREGROUND - closest layer. This layer is usually most colorful, most defined
and has the biggest objects because it is closest.
MIDDLEGROUD - middle layer. This layer usually gets less colorful, less defined
and has medium sized objects
BACKGROUND- back layer. This layer is the most dull, barley defined
and has the smallest objects because it is furthest away


Then, using a cool colored background paper, draw an underwater scene with sand and plants at bottom. To make the background appear realistic and deep,
Outline objects closest to you with with black marker.
Outline the object further away with a darker than your paper marker (ex: dark green on green)
You can use complimentary colors to really make the fish "POP" or be Emphasized on the scene.
COOL PAPER for OCEAN
Pick Blue, green or violet for the ocean.
Cool colors tend to recede instead of pop out.


Finished on light blue

Student Backgrounds.


Fransisco (7), Grayson (6) and Danielle (7)
- Draw the MIDDLE GROUND towards the bottom.
Outline with black marker.
This layer is supposed to be clean and defined.
- Shade with a like color from your paper color,
highlight with a white.
- Draw the BACKGROUND with a pencil.
Outline with the shade you used to shade the middle ground (NOT black).
This layer is supposed to appear far back and blurry.
CUTTING OUT HOT FISH


Cut out the fish you created on the hot paper, being careful not to cut off the outline.
The outline helps POP the fish off of the paper.
You can create the illusion of more fish by folding and cutting fish vertical down middle and
glue them on the edges of the paper.
This gives e 8 fish instead of four! and adds to the illusion of Space,
as though the paper continues past what the viewer sees.
Do this with at least one of your fish.


Have Fun!