图形风格水彩蝴蝶
原文链接:https://createartwithme.com/watercolor-butterfly-with-graphic-style-background/
日期: 2012-10-29
作者: Michelle East
分类: 六年级、美术课、绘画课、高中美术、综合媒介课、初中美术、绘画课、钢笔与墨水画、水彩课、工作表与讲义
标签: 美术、儿童美术课、儿童美术课、少儿美术课、美术项目、儿童美术项目、美术项目(通用)、少儿美术学校、画家绘画工具、鸟类主题美术、黑白设计、蝴蝶主题美术、色彩课、构图、手工、涂鸦艺术、涂鸦设计、高中绘画课、初中绘画课、以鸟类为题材的艺术元素项目、表现性色彩课、适用于高中、图形风格蝴蝶、图形风格美术、图形风格美术课、高中图形风格课、图形风格课、高中美术、印度墨水、昆虫主题项目、少儿混合媒介美术课、少儿美术课、少儿校内美术项目、综合媒介、混合媒介图形设计、初中美术、绘画、绘画课、正负空间反转、正负空间、正负空间反转、艺术原理、重复、节奏感、三分法、马克笔(Sharpie)、Sharpie艺术、Sharpie艺术课、艺术中的空间、空间课、教师用少儿美术项目、少儿美术教学、十二年级、描图纸、明快的水彩、视觉艺术、水彩、水彩与钢笔画、水彩与钢笔画、少儿水彩美术项目、水彩蝴蝶、水彩课、水彩颜料、水彩绘画课、水彩钢笔与墨水画、禅绕画、禅绕画图案
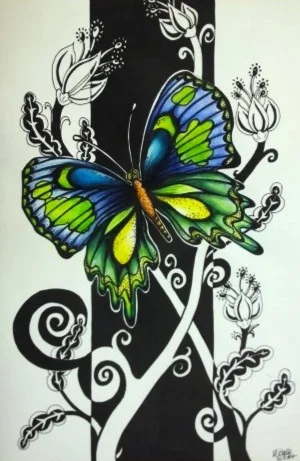
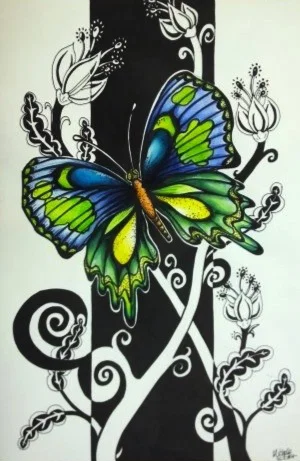
图形风格水彩与钢笔画课
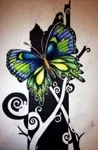
这个创作构思源于一个意想不到的地方——一家养老院的洗手间!可惜的是,墙上展出的作品均未署名。其基本构思是:以钢笔或墨水勾勒一只鸟或蝴蝶的线稿,再用明快的水彩上色,并搭配黑白图形风格背景。 当时共展出四幅作品,视觉冲击力极强,令我深受启发,决定创作自己的版本!本项目适合六至十二年级学生,也是一次关于正负空间反转的趣味探索!
所需材料: 绘画纸或描图纸、马克笔(Sharpie)或黑色墨水、水彩


制作步骤:
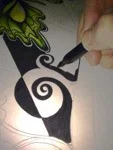
- 先用铅笔绘制一只蝴蝶、鸟类或昆虫;再用马克笔勾勒轮廓线——可变换线条粗细以增强表现力;也可局部点绘(stippling)来添加肌理感。若选用墨水而非马克笔,则应先完成水彩上色,再施加墨线。
- 若使用马克笔,则此时用水彩为画面着色。
- 接着,用直尺在主体图像后方画一个矩形框,须自上而下贯穿整幅画面。
- 在矩形内外添加其他视觉元素(如花朵、涡卷纹等),使其穿插于矩形区域内外,以增强画面趣味性。
- 最后,用马克笔或钢笔与墨水填满背景。
- [
## Pen & Ink Techniques Lesson Plan & Worksheet
$2.75](https://createartwithme.com/shop/lesson-plans-worksheets/art-technique-lesson-plans-and-worksheets/painting-lessons-worksheets-pdf/pen-ink-techniques-lesson-plan-worksheet/)加入购物车
- [
## Ultimate Watercolor Techniques Lessons Packet
$6.50](https://createartwithme.com/shop/lesson-plans-worksheets/art-technique-lesson-plans-and-worksheets/painting-lessons-worksheets-pdf/ultimate-watercolor-techniques-lessons-packet/)加入购物车
若您转载此课例(文字或图片形式),请务必注明并链接出处:Create Art with ME。*
相关课程:
突破边框
钢笔与墨水技法教案与工作表
基础水彩绘画技法教案与工作表
进阶水彩绘画技法与工作表(含学生指南)
终极水彩技法套装(含三套完整教案与工作表)
Watercolor Butterfly with Graphic Style Background
Original: https://createartwithme.com/watercolor-butterfly-with-graphic-style-background/
Date: 2012-10-29
Author: Michelle East
Categories: 6th Grade, Art Lessons, Drawing Lessons, HS Art, Mixed Media Lessons, MS Art, Painting Lessons, Pen & Ink, Watercolor Lessons, Worksheets & Handouts
Tags: art, art class for kids, art lessons for children, art lessons for kids, art projects, art projects children, art projects for, art schools for kids, artist painting supplies, bird art, black and white design, butterfly art, color lesson, composition, craft, doodle art, doodle design, drawing lesson for high school, drawing lesson for middle school, elements of art bird project, expressive color lesson, for high school, graphic design butterfly, Graphic Style Art, Graphic Style Art Lesson, graphic style for high school, graphic style lesson, HS art, India ink, insect project, kids art class art with mixed media, kids art lessons, kids school art projects, mixed media, mixed media graphic, MS Art, paint, painting lesson, positive and negative space reversal, positive negative space, Positive Negative Space Reversal, principles of art, repetition, rhythm in art, rule of thirds, Sharpie (marker), sharpie art, sharpie art lesson, Space in art, space lesson, teacher art projects for kids, teaching art to kids, Twelfth grade, velum paper, vibrant watercolors, Visual Arts, Watercolor, Watercolor & Pen Art, Watercolor and Pen Art, watercolor art projects for kids, watercolor butterfly, watercolor lesson, watercolor paint, watercolor painting lesson, Watercolor Pen and ink, zentangle, zentangle designs
Graphic Style Watercolor & Pen Art Lesson
I happened upon the idea for this piece in an unlikely place- the restroom of a retirement home! Unfortunately, the artwork on the walls didn’t have any artist name anywhere on the pieces of art. The basic idea was a pen & ink drawing of a bird or butterfly colored with vibrant watercolors & a black & white graphic style background. There were four prints & they were so eye catching that I was inspired to create my own! This could be a project for 6-12th grade and it is a fun exploration of positive and negative space reversal!
Supplies: drawing or velum paper, sharpies or black ink, watercolors
Instructions:
- In pencil, draw a butterfly, bird or insect. Outline your lines with Sharpie-vary the width to add interest. You can also stipple some of it to add texture. If you choose to use ink instead of sharpie, then you should paint it first, then apply the ink.
- If using sharpie, now paint the image with watercolors.
- Next, use a ruler to draw a rectangle behind the image. It needs to go from top to bottom.
- Draw in any additional visual elements (like flowers, swirl ides, etc.). You can have them go in & out of the rectangle area for more interest.
- Use a sharpie or Pen & ink to fill in the background.
- [
## Pen & Ink Techniques Lesson Plan & Worksheet
$2.75](https://createartwithme.com/shop/lesson-plans-worksheets/art-technique-lesson-plans-and-worksheets/painting-lessons-worksheets-pdf/pen-ink-techniques-lesson-plan-worksheet/)Add to cart
- [
## Ultimate Watercolor Techniques Lessons Packet
$6.50](https://createartwithme.com/shop/lesson-plans-worksheets/art-technique-lesson-plans-and-worksheets/painting-lessons-worksheets-pdf/ultimate-watercolor-techniques-lessons-packet/)Add to cart
If you choose to re-blog or use this lesson in any way (written or photos), then please make sure to link/credit *Create Art with ME.*
Beyond the Border
Pen & Ink Techniques Lesson Plan & Worksheet
Basic Watercolor Painting Techniques Lesson Plan & Worksheet
Advanced Watercolor Painting Techniques & Worksheet (includes student guide)
Ultimate Watercolor Techniques Packet (3 Full Lessons & Worksheets in 1 Packet)


